{Materials Required}:
cotton fabric
felt {white, black and an additional color of choice is optional}
sewing machine
rice
fiberfill
scissors
pen
funnel
Okay, so first you need to decide how big you want your owl/s. I decided to go with two different sizes: one baby and one mama owl. (But please KEEP IN MIND: if you're using them for bookends, the bigger the better, to hold all that book weight. I decided I only needed one bookend, and am going to use my smaller one as a play, beanbag sort of toy). For the small one, I cut a rectangle about 7x8 inches, and for the larger one, a square about 11x11 inches. Then I freehanded an owl shape onto the backside of one of my smaller cotton rectangular pieces of fabric. I drew only HALF of the owl, then layed it on top of my other small rectangular pieces of fabric. Next, I folded the fabric over (length-wise), and cut along my owl shape. By using this folding & layering method, you'll get symmetrical sides for your owl and matching sides for the front and back of him, too.
 |
| half of my owl shape (the smaller owl) |
 |
| how it looks folded, before cuting |
Now take your white felt, and cut out 2 circles (layer two small squares together, and then cut the circles from that), which will make up part of the owl's eyes. You're going to need to cut out 4 white circles altogether - one smaller pair for the baby owl, and one larger pair for the mama owl. (You can't go wrong with a size here...just eyeball what size you think looks best). HINT: use some sort of round thing you have in your house to make the perfect circle...a biscuit cutter (as I did, shown below), tupperware lid, etc.
For the eyes & beak, you're going to use your felt. Cut out two small black circles for the baby owl's pupils. Cut out two larger black circles for the mama owl. OPTIONAL: I decided to add another dimension to mama's eyes, by adding a pair of pink circles to her eyes...right in between the white & black circles for her eyes. Now you can also cut out a beak to match: for the smaller owl, I did a little triangle, and for the mama owl, I did a diamond shape - both in an orangey-yellow color of felt.
Take just one of the pieces of one of your owl bodies, and lay the eyes & beaks on it to see where you want them to be. Now pin down the beak and remove the eyes from the body. Sew the beak on - be sure you're sewing onto the RIGHT side of your fabric, and sewing onto only ONE of the body pieces!
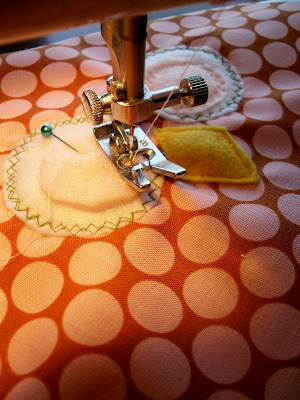
Now take your white eyes, and pin them in place on your body, right above the beak. Sew them on. You can do a straight stitch or zigzag in a matching or contrasting color - whatever you prefer! I chose a soft pink for my baby owl, and a green thread for my mama owl (to complement her baby green owl!), and did mine in a zigzag stitch for fun.
After you've stitched on the whites, stitch on the middle color (if you chose to do so), and last, the pupils.
Here is what your owl will look like so far:
Okay, time to put the owl together! Go ahead and put the pieces of the owl's body together, being sure the "right" sides are together and matched up along the edges. Pin in place.
Sew (I chose about a 1/2" seam for my larger owl, and just 1/4" seam for my smaller one) along the edges, leaving about 2 inch opening at the bottom of your owl (be sure to backstitch when you start & stop, to secure your seams).
Clip the curves. (If you're new to sewing, this means that wherever there is a curve (at the top between the ears, and on both sides of the body), you're going to need to take your scissors and cut little slits just about to the seam. This will allow for the curves to lay right).
Now turn your body right-sides out. (You're almost there!) You're going to take some of your fiberfill and stuff this into the head part of your owl. Be sure to really get it into the ears and in their points. This will help your owl keep its shape and stay 3-dimensional.
Once you have enough fiberfill to fill the ears and about halfway down the eyes, you're going to start adding the rice. This will help weigh him down...necessary if you want your owl to be able to "stand" and definitely necessary if you're using as bookends. Use your funnel for less mess.
Once he's filled about 85 -90 percent of the way, you can stop filling. Now you just need to turn in the seams, and either sew straight across with your sewing machine, or hand-stitch it shut, along the bottom.
Now just follow the above steps for your second owl, and you're done! Enjoy!
Have a product you'd like reviewed?
Contact me at adamsblankie@gmail.com
www.adamsblankie.com
www.gourmetplay.etsy.com


0 comments:
Add Your Couture Comment